Do you all back up your blogs? As a blogger of only four months I didn't know I should do. There is a great tutorial, here is a direct link to the post from Debbie at A Quilters Table for those who use Blogger. I have now backed up my blog in a few minutes. I will add a link to my Blogging Tutorials page.
But what is a post without a little eye candy? Ok then, here is a taste of what is to come, the back of City Lights, part quilted. I'm a bit further on now and I am so pleased with it. What do you thing so far?
Smiles
Kate
Saturday, 14 May 2016
Tuesday, 10 May 2016
Hexagon Quilt
I was recently at my quilt group which is held in a shop, a lady came in with the most stunning quilt top, almost finished, and allowed me to take some pics to share with you. They were just taken on my phone and there wasn't much room so take a proper full pic so apologies for the quality.
I believe the quilt is called Insanity and I believe it has over 10,000 hexagons.There was another five rows of cream to be added as the final border.
The back of the quilt was as beautiful as the front but I didn't get the chance to take a pic.
I believe the quilt is called Insanity and I believe it has over 10,000 hexagons.There was another five rows of cream to be added as the final border.
It had taken her 10 years although there had been long periods where she had laid it aside. Now it doesn't match her bedroom and is to become a sofa quilt.
Did I mention it was half inch hexagons?
The last five borders will no longer be added although she will add either a row of cream hexagons, or appliqué the edges onto cream to finish it off and not loose the wonderful hexagon edge.
I didn't even get the ladies name, when talking quilts, names become irrelevant. She did take my blog address though and if you are reading thank you so much for letting me photograph and share your most beautiful quilt.
Linking up with Freemotion by the River, Let's Bee Social, and Confessions of a Fabric Addict, My Quilt Infatuation, TGIFF, Can I Get A Whoop Whoop? , Crazy Mom Quilts
Smiles
Kate
Monday, 9 May 2016
Adding Pages in Blogger
In the last tutorial I added a Home button, so I already have a navigation bar under the header on my blog. To make it easy for readers to find the blogging tutorials in the future I decided to add a Blogging Tutorials page to the header.
Pages are just that, a static page where you can add text, pictures, and links. Just like a post really, but these pages are only accessed via the navigation bar, they wont be seen in your posts archive.
To add a page first click on Pages on the left, you can see it in orange as I have already clicked on it. It says ‘Pages All’ at the top and underneath ‘There no pages’ as I haven’t added any yet. Click on ‘Create a new page’ in blue.
This is my new page and as you can see it is just like writing a blog post. I can change the font, add pictures and links, everything I would normally do. I know what I want to add to my page………
I have now added a few words saying what this page is about. You don’t have to do this bit, it’s just how I like to do it. You can save the page at any point and just like a post it will be saved as a draught until it is finished. Next I added a picture in exactly the same way I normally would and underneath I added the link to the first blog tutorial I did, How to Grab a Button.
Rather than having people scroll down to the bottom to find the latest tutorial I am clicking on the page above the first tutorial picture and inserting the second one. I added them all in until I got to the latest one. As I do more bogging tutorials all I have to do is add a direct link to the top of the page when they are published.
At this point I remembered I hadn't added the name of the page name to the page which is just like adding a name to a blog post. You can just save it at this point and it will remain a draught page or if it is finished click Publish on the right in orange. You can edit the page at any time in the future.
Now we have to add the page to the navigation bar.
Go into layout, we want the Pages Gadget, click on ‘Edit’ on the right side.
I have ticked the ‘Blogging Tutorials' page, under ‘Home’ page. Now click save. If you have several pages you can change the order of them here too.
Take a look at your success and congratulate yourself.
This will be my last blogging tutorial unless someone makes a request which I can fulfil. I hope you have enjoyed reading them and I have been of some help. I have certainly learned a lot and had fun in the process.
Linking up with Freemotion by the River, Let's Bee Social, and Confessions of a Fabric Addict, My Quilt Infatuation, TGIFF, Can I Get A Whoop Whoop? , Crazy Mom Quilts
Smiles
Kate
Sunday, 8 May 2016
New to me quilting stitch
Just a short post to link up with Pink Doxies May Brave Quilter link up.
I have already linked with Heidi at Red Letter Quilts OMG for my City Lights quilt, but I want to do something new, I am going to try straight line quilting using the Serpentine stitch (Bernina 4). Not only that but because the quilt is multicoloured I am stitching with a toning grey thread which I can't hide. Oh noooooooooo.! You will be able to see my stitching, no hiding place and I will be revealed as a fraud.
Here it is, one last pic of my beautiful quilt before it is forever changed.
I have already linked with Heidi at Red Letter Quilts OMG for my City Lights quilt, but I want to do something new, I am going to try straight line quilting using the Serpentine stitch (Bernina 4). Not only that but because the quilt is multicoloured I am stitching with a toning grey thread which I can't hide. Oh noooooooooo.! You will be able to see my stitching, no hiding place and I will be revealed as a fraud.
Here it is, one last pic of my beautiful quilt before it is forever changed.
Wish me luck!
Smiling through my tears
Kate
Thursday, 5 May 2016
Blogging Tutorial - Adding a Home button
I thought I didn’t need home button, but I was wrong. If someone follows a link to your page, that’s all they will see, that page, and they won't see your latest posts, can they judge your blog on that? Some of our posts are better than others, what if it’s an iffy one, they may decide not to link up again. Yes, they can look at your previous posts in your sidebar, but not everyone will, do you?
If you want to know how add a pages bar with a 'Home' button read on, if not hit my home button or look at the posts in the sidebar and see what else I blog about, or my Blogging Tutorials button, just in case there is something there you may be interested in………….
So, how do we add a home button, first we go into Layout.
Under the Header there is a ‘cross column’ with ‘Add a Gadget’ in blue, click there.
On the left it has the ‘Home ’page button ticked for you. On the right is the list order, if you have several pages you can just drag them to change the order. All we need to do is click save.
Now Save Arrangement on the right assuming you want the pages bar under your header. If you want it elsewhere you can drag it into the position you want or add it somewhere else, like, the bottom of your blog space.
This is what we get. Happy? If you decide you don’t want it you can always click edit on the pages gadget, then remove.
I hope you enjoyed this and find it useful. My next blogging tutorial will be how to add pages, and how they work.
Until then
Smiles from
Kate
Tuesday, 3 May 2016
A New Quilt and Good News
Don’t you just love starting a new quilt? Deciding on a pattern, gathering fabrics, choosing, discarding, choosing again. Hopes and dreams, thoughts of loved ones, all bound up together in the promise of this wonderful new creation.
But first I have to share my good news or I'll burst. I got an email to say I have been accepted for the 2016 New Quilt Bloggers Blog Hop. So excited!!!! Did you notice what is on my sidebar? The Button. Oh yes, I learned how to add them just in time. I'm doing my happy dance.
Second, I am linking up to Heidi at Red Letter Quilts for One Monthly Goal. This month I have to finish City Lights. It needs the back sorted, layered, quilted, and binding. I have three weeks. Yes I know you've seen this pic before but I love it, in fact it's now my desktop pic.
Now, back to the new quilt. All of April I was pursued by circle quilts, wherever I looked, I LOVE circle quilts. Did you see Luna’s wonderful quilt top Amish Grace? So beautiful and I so love the colours. If you click through don't forget to check out her Quits page, you won't be disappointed. Luna produces some of the most wonderful modern quilts. Then there is Kaja’s lovely quilt at Sew Slowly, this was the first one that piqued my interest. Ann from Fret not Yourself has made and stunning quit called Freddy Dot Com, be still my beating heart. I gave in, I HAVE to make a circle quilt, but I reasoned that it would be to my advantage, after all there are times when it is not convenient or practical to do machine work, if I have some handwork such as appliquéing circles then it could be a get up and go project, hmmmmmmmm
I checked my stash, white tone on tone or a solid sort of mushroom colour. Not how it looks in my head so it was time to go shopping. I knew I wanted strong, though not necessarily bright colours, maybe on a dark blue or grey background so the lovely colours shine out. How come you can never find the right colour when you want it?
Then, I spotted it, my perfect background. Lynette Anderson My Hearts at Home, love it. Then to sort the circles. I did find some fabrics in my stash, in large scraps fat quarters and half meters, but of course I HAD to add to it. What about these. A mixture of solids, textures, and a shot cotton. Perfect. Except I'm not convinced about the bright purple and the bottle green, any thoughts? The wine and the dark rusty colour together seem similar too????????
I had already planned it out, 8 inch finished blocks, quarter circles. I found a pair of compasses, measured out the square, drew the quarter circle, made a template and cut out a dozen freezer paper templates.
Here is where I am now. All 36 blocks cut out and the first 12 quarter circles ready to be appliquéd.
Just a reminder in case you missed a post, I now have a home button AND I added a page, Blogging Tutorials. Now if you need to find one or, think you may have missed one they are all together, including the new one, Adding a Link in your Posts. Before you ask, yes I have one for adding a home button which I will post in a couple of days, and I plan to do one for adding pages, and how they work.
Linking up with
Heidi at Red Letter Quilts One Monthly Goal
Bits 'n' Bobs Design Board Monday
Love Laugh Quilt Monday Making
Just a reminder in case you missed a post, I now have a home button AND I added a page, Blogging Tutorials. Now if you need to find one or, think you may have missed one they are all together, including the new one, Adding a Link in your Posts. Before you ask, yes I have one for adding a home button which I will post in a couple of days, and I plan to do one for adding pages, and how they work.
Linking up with
Heidi at Red Letter Quilts One Monthly Goal
Bits 'n' Bobs Design Board Monday
Love Laugh Quilt Monday Making
I'll let you know how I get on later in the week
Smiles
Kate
Sunday, 1 May 2016
Blogging Tutorial - Adding links in Blogger
This was the first problem I encountered using Blogger, I thought I was adding links, but I was just typing in the address followed by a space, it worked, but wasn’t it the best way and I couldn’t give a link to a specific post, only to an address. Angels came to help me in the form of other bloggers, this is what I do now.
Imaging I am typing a post (which surprisingly I am) and I want to add a link, first I type it, for example:
One of my most popular posts has been A Finish, good news and bad.
I need to open another tab and find the page I want to enable me to get the link.
I have opened my blog but instead of scrolling down from the homepage I clicked on the post I want to link up to in the sidebar, the one in the pic, A Finish, good news and bad. Next I clicked on the bar at the top that gives the web address, if you look it doesn't just say smilesfromkate, it also says A Finish, good news and bad, this is what we want, to link to a specific post rather than the homepage. This will work for any site, even when shopping in Amazon or Craftsy. Press 'control c' or 'cmd c' if you use a Mac, to copy. Go back to your new post we left open.
First we need to highlight the words we want to be the link, this can be any words you want, for this tutorial we will highlight A Finish, good news and bad, but you could say find it here and just use 'here' and it would work the same, the actual words on the screen are not important to the link, only what is highlighted.
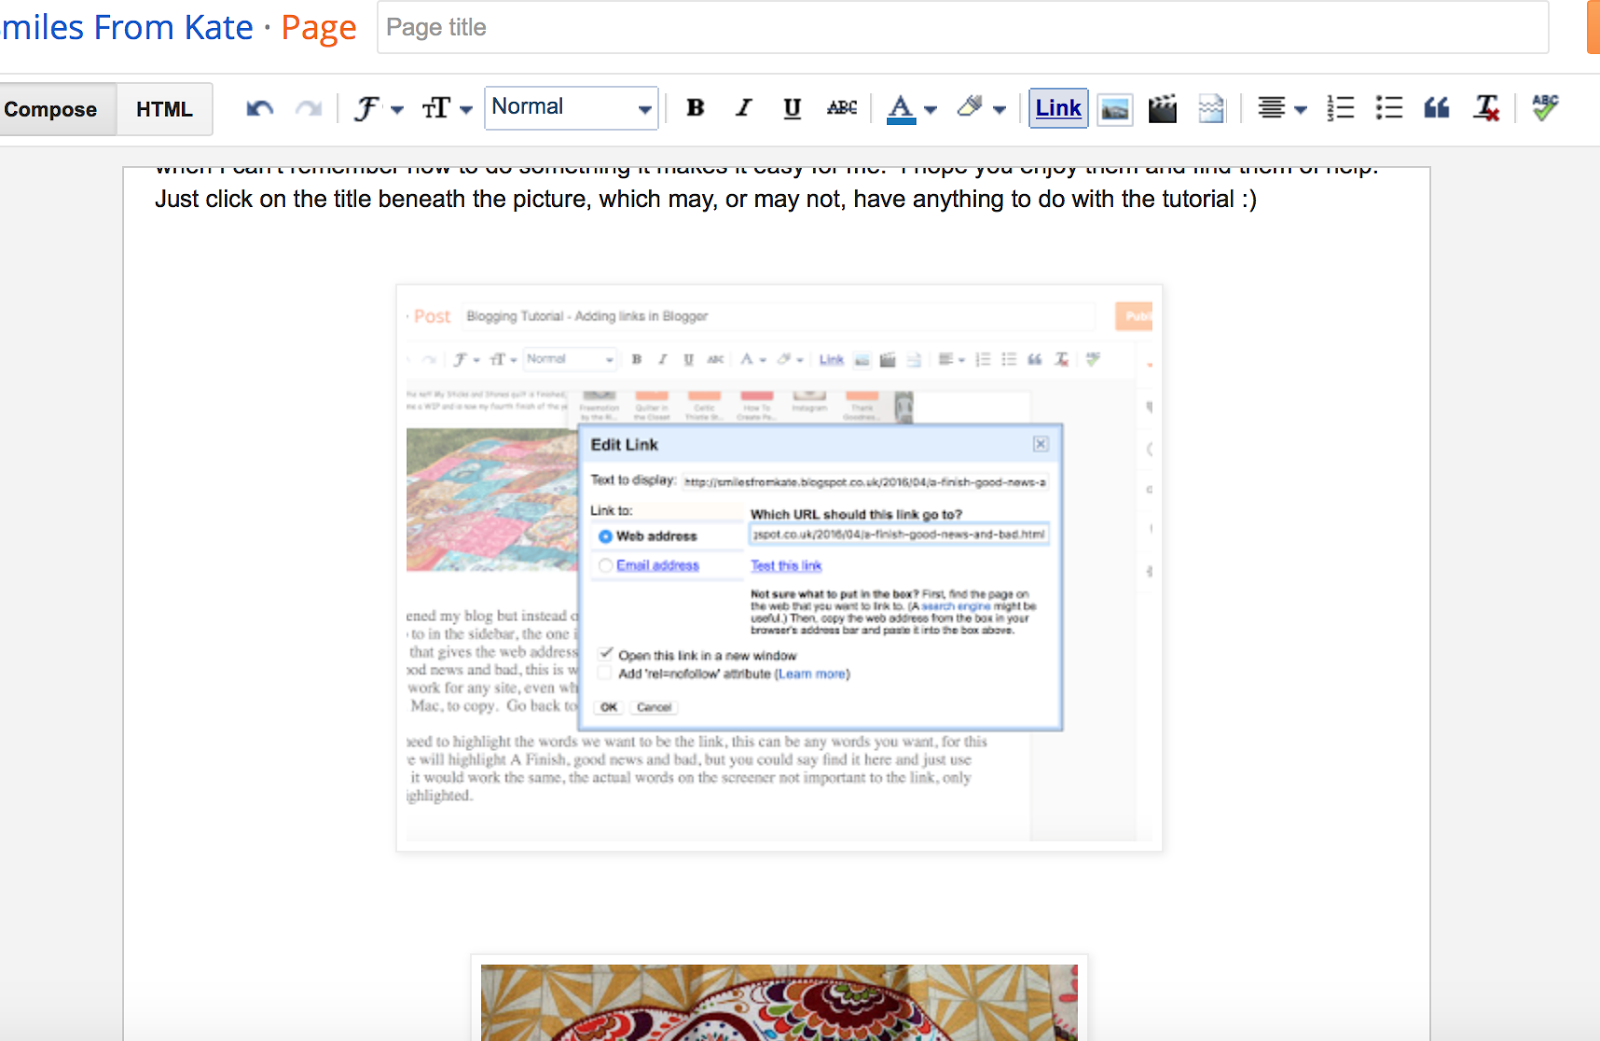
Look at the bar at the top of the pic, click on the blue Link button.
Now paste the web address you copied into the box, control v (cmd v). You see further down it says Open this link in a new window, tick this if that's what you want, remember if you are adding a link to another site the person reading may not come back to you. Click OK
One of my most popular posts has been A Finish, good news and bad.
The wording we highlighted changed colour when it became a link. Try it, it will take you to the post.
When you join a Linky Party make your link the same way to the specific post.
Add your links at the bottom of the post you are liking to. When I'm doing this I first type it all in then I open a new tab. Starting at the top I highlight 'Lorna at Sew Fresh Quilts Lets Bee Social' then in the new tab I go to Lorna's homepage and get the link, come back to my post, click on 'Link', paste it in and click OK. After all these lovely ladies host these parties every week, the least we can do is link back to them to say 'thank you'.
For those of you who requested a tutorial on screenshots, please find a link on my Blogging Tutorials page.
This week I am linking to
I hope you enjoyed this tutorial
Smiles
Kate
Subscribe to:
Posts (Atom)