Pages

Showing posts with label Blogging Tutorial. Show all posts

Friday, 27 May 2016

Changing the size and position of your buttons

I am participating in the 2016 New Quilt Bloggers Blog Hop just now.  It has been great so far, and I am learning a lot.  This week in small groups we had to critique each others blogs.  I found it the hardest thing so far but I just got on with it.  You have to be honest, we are all fairly new to this and if we don't get honest opinions how will we learn?

One thing that came up for my blog was my sidebar was a bit messy.  To be honest it was fair criticism, I wasn't happy with it myself but I didn't know how to change it.   It came down to the buttons.

They were different sizes and where some were in the middle, some were at the side. Now the thought of code scares me, but it’s a button, if I mess it up all I need to do is delete it, and go grab it again, yes?  I put my big girl pants on.


This is what I mean

So I looked at the code.


See where it says width 200?  I knew that was the size, so, what would happen if I changed it to 150.


Oh yes! It's now the same size as the rest.  But it's not in the middle.  So I looked at the button codes again.


You see the bit at the top that says <div align="centre">?


I copied it, and pasted it to the beginning of the one at the side I wanted to change.  Brave or foolhardy?


Oh Yes!!!  I'm doing my happy dance.  All that was left was to drag my buttons around and put them in the order I wanted.


Yes code is scarey, not all buttons have the size numbers in the code, one of my buttons is slightly bigger than the others and I don’t know how to change that one so I have positioned it at the bottom so it isn’t as noticeable.


EDIT

Thank you Gene who commented and gave some great advice.

Here is what I did to change that button size


This is the code for the button I need to change, look at the bottom line.


Now check this button code, again bottom line.   I am copying - width=“150”border=“0”


Now I have pasted it into the same position and saved it.

Now check my sidebar, perfect.

Thank you so much Gene. If you haven’t been on Gene’s blog before I suggest you check it out and have a good look around, it’s great, and it even has video tutorials.

So I'm challenging you, are you brave enough to have a go?


Smiles
Kate


Saturday, 14 May 2016

Back Up Your Blog Tutorial Link

Do you all back up your blogs?  As a blogger of only four months I didn't know I should do.  There is a great tutorial, here is a direct link to the post from Debbie at A Quilters Table for those who use Blogger.  I have now backed up my blog in a few minutes.   I will add a link to my Blogging Tutorials page.

But what is a post without a little eye candy?  Ok then, here is a taste of what is to come, the back of City Lights, part quilted.  I'm a bit further on now and I am so pleased with it.  What do you thing so far?


Smiles
Kate

Monday, 9 May 2016

Adding Pages in Blogger

In the last tutorial I added a Home button, so I already have a navigation bar under the header on my blog.  To make it easy for readers to find the blogging tutorials in the future I decided to add a Blogging Tutorials page to the header.  

Pages are just that, a static page where you can add text, pictures, and links.  Just like a post really, but these pages are only accessed via the navigation bar, they wont be seen in your posts archive.  


To add a page first click on Pages on the left, you can see it in orange as I have already clicked on it. It says ‘Pages All’ at the top and underneath ‘There no pages’ as I haven’t added any yet.  Click on ‘Create a new page’ in blue.


This is my new page and as you can see it is just like writing a blog post.  I can change the font, add pictures and links, everything I would normally do.  I know what I want to add to my page………


I have now added a few words saying what this page is about.  You don’t have to do this bit, it’s just how I like to do it.   You can save the page at any point and just like a post it will be saved as a draught until it is finished.   Next I added a picture in exactly the same way I normally would and underneath I added the link to the first blog tutorial I did, How to Grab a Button.  


Rather than having people scroll down to the bottom to find the latest tutorial I am clicking on the page above the first tutorial picture and inserting the second one.  I added them all in until I got to the latest one.  As I do more bogging tutorials all I have to do is add a direct link to the top of the page when they are published.


At this point I remembered I hadn't added the name of the page name to the page which is just like adding a name to a blog post.  You can just save it at this point and it will remain a draught page or if it is finished click Publish on the right in orange.  You can edit the page at any time in the future.


Now we have to add the page to the navigation bar.


Go into layout, we want the Pages Gadget, click on ‘Edit’ on the right side.


I have ticked the ‘Blogging Tutorials' page, under ‘Home’ page.   Now click save.  If you have several pages you can change the order of them here too.


Take a look at your success and congratulate yourself.

This will be my last blogging tutorial unless someone makes a request which I can fulfil.  I hope you have enjoyed reading them and I have been of some help.  I have certainly learned a lot and had fun in the process.

Linking up with Freemotion by the River, Let's Bee Social, and Confessions of a Fabric AddictMy Quilt InfatuationTGIFFCan I Get A Whoop Whoop? , Crazy Mom Quilts

Smiles
Kate


Thursday, 5 May 2016

Blogging Tutorial - Adding a Home button

I thought I didn’t need  home button, but I was wrong.  If someone follows a link to your page, that’s all they will see, that page, and they won't see your latest posts, can they judge your blog on that?  Some of our posts are better than others, what if it’s an iffy one, they may decide not to link up again.  Yes, they can look at your previous posts in your sidebar, but not everyone will, do you?  
If you want to know how add a pages bar with a 'Home' button read on, if not hit my home button or look at the posts in the sidebar and see what else I blog about, or my Blogging Tutorials button, just in case there is something there you may be interested in………….

So, how do we add a home button, first we go into Layout. 


Under the Header there is a ‘cross column’ with ‘Add a Gadget’ in blue, click there.


Now we find a list of all the gadgets we can add, there are lots of them if you would like to scroll down and take a look.  Click on Pages.


On the left it has the ‘Home ’page button ticked for you.  On the right is the list order, if you have several pages you can just drag them to change the order.  All we need to do is click save.


Now Save Arrangement on the right assuming you want the pages bar under your header.  If you want it elsewhere you can drag it into the position you want or add it somewhere else, like, the bottom of your blog space.


This is what we get.  Happy?  If you decide you don’t want it you can always click edit on the pages gadget, then remove.

I hope you enjoyed this and find it useful.  My next blogging tutorial will be how to add pages, and how they work.

Until then
Smiles from
Kate


Sunday, 1 May 2016

Blogging Tutorial - Adding links in Blogger

This was the first problem I encountered using Blogger, I thought I was adding links, but I was just typing in the address followed by a space, it worked, but wasn’t it the best way and I couldn’t give a link to a specific post, only to an address.  Angels came to help me in the form of other bloggers, this is what I do now.

Imaging I am typing a post (which surprisingly I am) and I want to add a link, first I type it, for example: 
  
One of my most popular posts has been A Finish, good news and bad.
  I need to open another tab and find the page I want to enable me to get the link.


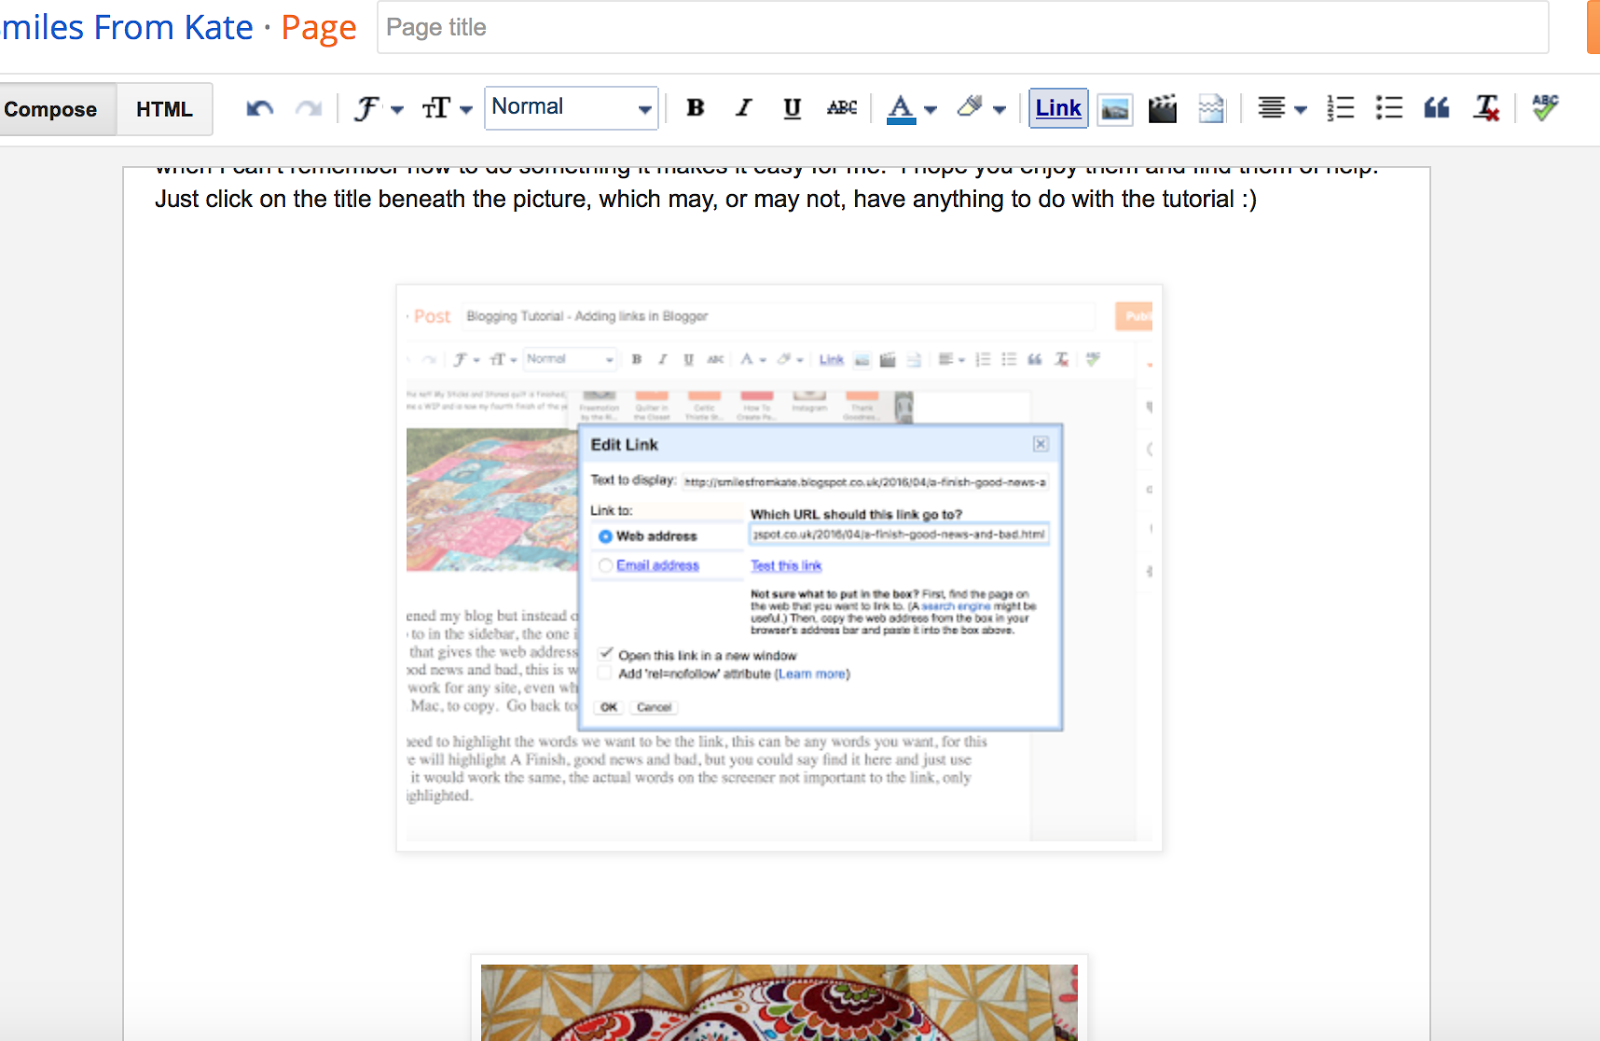
I have opened my blog but instead of scrolling down from the homepage I clicked on the post I want to link up to in the sidebar, the one in the pic, A Finish, good news and bad.  Next I clicked on the bar at the top that gives the web address, if you look it doesn't just say smilesfromkate, it also says A Finish, good news and bad, this is what we want, to link to a specific post rather than the homepage.  This will work for any site, even when shopping in Amazon or Craftsy.  Press 'control c' or 'cmd c' if you use a Mac, to copy.  Go back to  your new post we left open.


First we need to highlight the words we want to be the link, this can be any words you want, for this tutorial we will highlight A Finish, good news and bad, but you could say find it here and just use 'here' and it would work the same, the actual words on the screen are not important to the link, only what is highlighted. 
Look at the bar at the top of the pic, click on the blue Link button.


Now paste the web address you copied into the box, control v (cmd v).  You see further down it says Open this link in a new window, tick this if that's what you want, remember if you are adding a link to another site the person reading may not come back to you.  Click OK
  
One of my most popular posts has been A Finish, good news and bad.

The wording we highlighted changed colour when it became a link.  Try it, it will take you to the post.

When you join a Linky Party make your link the same way to the specific post.

Add your links at the bottom of the post you are liking to.  When I'm doing this I first type it all in then I open a new tab.  Starting at the top I highlight 'Lorna at Sew Fresh Quilts Lets Bee Social'  then in the new tab I go to Lorna's homepage and get the link, come back to my post, click on 'Link', paste it in and click OK.  After all these lovely ladies host these parties every week, the least we can do is link back to them to say 'thank you'.

For those of you who requested a tutorial on screenshots, please find a link on my Blogging Tutorials page.

This week I am linking to 


I hope you enjoyed this tutorial
Smiles
Kate


Thursday, 28 April 2016

Blogging Tutorial - changing the width of your blog

Yes, here I go again sharing my new found knowledge.  This time it's about the way the blog looks, you see a few weeks ago, and after taking advice from others, I started making my pics extra large, and yes, it is a good tip, it makes my pics look so much better and readers can see the detail more easily, without having to zoom in.  

There is a but, I noticed my pics were too wide and protruded into my side bar.   It looked all higgledy piggledy and messy, covering the side bar stuff, not good.  I had a search around, a bit of play, Eureka!   Much better.

This is how I did it, I can only show you in Blogger but other platforms should be similar.


We are going into Template this time, see it on the left highlighted in orange?  This is the page you get.  See the  orange  button, 'Customise' under the 'Live on Blog' pic? Click on that.


So here we are in the designer part.  On the left there are the options, we want ‘Adjust widths’.

See how the main bit and the side bar are running together?  That is what is happening on your blog, so let's change it.  See the slider at the top?  That's the bit we need to change.  To the right of the slider there is a white box which has number 950, that is the default setting.  


You can either  grab the slider and move it along to the right or click a bit further along the grey bar, keep clicking until you hit 1060.   It isn’t scary, nothing will happen to your blog unless we apply it.  See what has happened to my blog now?  Much better, nice and neat.    If its not quite right for you, slide it along a bit more, or a bit less, until it is right for you.  Don’t make it too wide though or it won’t all show on the screen.


All that's left to do is click on the orange button, top right ‘Apply to Blog’.  Now click on the blue one just to the left a  bit, 'Back to Blogger'.
That’s it.  You did it, another skill learned, and  the more you do the easier it will get.  Now congratulate yourself and have a well deserved cup of coffee and you earned that piece of cake too.  Oh, go on then, have a glass of wine instead, you deserve it.

I'll be back with another fix soon.  If there is any subject you would like me to cover, let me know.  I can't promise anything, but if I don't know I will try to find out, and we can learn together.

Edit  For those who wanted a tutorial on Screenshots, please find a link on my Blogging Tutorials page.

Smiles
Kate


Wednesday, 20 April 2016

Blogging tutorial, grab a button

Ok, all you people who know me can stop laughing now, I'm not known for being 'techy'.  This is for a fellow new blogger who uses Blogger and who wants to know how to grab a button and, yes, I know I only learned a couple of days ago but it will also act as a prompt for me if I forget, which is why I made it an idiots guide, my level.  If you know all about buttons then you may want to skip this post, the title says it all.

Most importantly,  I have to say thank you to Kelly at My Quilt Infatuation for giving me permission to use her Needle and Thread button in this tutorial.   I salute Kelly and all the other wonderful quilters who give us all the chance to link up and visit, get to know each other, make new friends, learn, share, and grow.  Kelly's Needle and Thread button is on the right sidebar along with Lorna's Let's Bee Social and Sarah's Can I Get a Whoop Whoop?   More to be added later.  Please check them out if you haven't already done so, and join their linky parties, they are so much fun.

And now without further procrastination...........


First go to the site and find the button you want, underneath it has a box with jumbled writing in, that’s the code, all you do is select it and copy, make sure you highlight ALL of it or it won’t work (yes I messed up first time)

Next open blogger and go into Layout


At the right side you will see add a gadget


Just click the add a gadget box and you get........


Nearly there, click HTML/JavaScript


Click in the box and paste the code you copied from the button and hit save.

You can add text in the Title box but remember in will appear on the blog, I went back and added 'test' so I knew which one it was, and which box I was working with.


This is it at the top.   Just click and drag it to where you want it to go.


Now its at the bottom, the one that says test.  Click Preview to check it's where you want it to be on the blog,  if it's not drag it elsewhere.  

Now click on the 'Edit' in the box..........


 and delete the world you typed into the title box so it won't show up on the blog then save.  Or leave it if you want it to show.  

If you changed your mind about the button click remove. 


If you are happy with it click save arrangement at the top right, where the preview button is.


There it is on my blog on my blog.  It will show on every post, including all the old ones.

I hope this all makes sense, I tried to do it logically with lots of pics to make it easy.  Hope you enjoyed this, and if it helps one new blogger then it was worth doing.

Kelly at My Quilt Infatuation, Needle and Thread Thursday


Smiles from,
Kate